Installing Azure IoT Operations
Welcome to the second post in my series exploring the innovative features of Azure IoT Operations.
In this post, I will walk you through the step-by-step process of installing Azure IoT Operations on an Azure Arc-enabled Kubernetes cluster.
This guide is tailored for a machine running Linux Ubuntu, ensuring a seamless setup for managing IoT workloads in a Hybrid Cloud environment.
Whether you’re provisioning resources in Azure Cloud or configuring an Edge Cluster, this tutorial will provide you with the necessary instructions to get started efficiently.
Cloud services requirements
- Azure Subscription (with Contributor rights)
- The solution will deploy the following resources:
- Resource Group
- Storage Account
- Schema Registry
- 2 Managed Identities
- 1 App Registration (Service Principal for Edge Gateway)
- Virtual Machine (if you want to test everything in Azure Cloud)
Prepare and provision Cloud Platform
- Open a browser and navigate to the Azure Portal
- Use the Azure Cloud Shell (Bash)
- Set Environment Variables for services to create in Azure:
1
2
3
4
5
6
7
8
9
10
11
12
13
14
export TTYF_SUBSCRIPTION_ID="<YOUR_SUBSCRIPTION_ID>"
export TTYF_LOCATION="<YOUR_LOCATION>"

prefix="ttyf"
random=$(tr -dc 'a-z' < /dev/urandom | fold -w 4 | head -n 1)$(date +%y%m%d)
export TTYF_RESOURCE_GROUP="${prefix}-rg"
export TTYF_KEYVAULT_NAME="${prefix}${random}kv"
export TTYF_STORAGE_ACCOUNT_NAME="${prefix}${random}sa"
export TTYF_SCHEMA_REGISTRY_NAMESPACE="${prefix}${random}srns"
export TTYF_SCHEMA_REGISTRY_NAME="aio"
export TTYF_AIO_CLUSTER_NAME="${prefix}${random}aiocl"
export TTYF_AIO_SERVICE_PRINCIPAL="${prefix}-aio-sp"
export TTYF_AIO_MI_SECRETS="aio-secrets"
export TTYF_AIO_MI_COMPONENTS="aio-components"
- Select Azure Subscription:
1
az account set --subscription $TTYF_SUBSCRIPTION_ID
Azure IoT Operations prerequisites
- Register required Resource Providers (execute this step only once per subscription):
1
2
3
4
5
6
 az provider register -n "Microsoft.ExtendedLocation"
 az provider register -n "Microsoft.Kubernetes"
 az provider register -n "Microsoft.KubernetesConfiguration"
 az provider register -n "Microsoft.IoTOperations"
 az provider register -n "Microsoft.DeviceRegistry"
 az provider register -n "Microsoft.SecretSyncController"
- Install Azure CLI extension for Azure IoT Operations:
1
 az extension add --upgrade --name azure-iot-ops
- Create a Resource Group:
1
az group create --location $TTYF_LOCATION --resource-group $TTYF_RESOURCE_GROUP --subscription $TTYF_SUBSCRIPTION_ID
- Create a Managed Identity for Azure IoT Operations (components):
1
az identity create --resource-group $TTYF_RESOURCE_GROUP --name $TTYF_AIO_MI_COMPONENTS
- Create a Managed Identity for Azure IoT Operations (secrets):
1
az identity create --resource-group $TTYF_RESOURCE_GROUP --name $TTYF_AIO_MI_SECRETS
- Create a storage account with
hierarchical namespace enabled:1
az storage account create --name $TTYF_STORAGE_ACCOUNT_NAME --resource-group $TTYF_RESOURCE_GROUP --enable-hierarchical-namespace
- Create a schema registry that connects to your storage account:
1
az iot ops schema registry create --name $TTYF_SCHEMA_REGISTRY_NAME --resource-group $TTYF_RESOURCE_GROUP --registry-namespace $TTYF_SCHEMA_REGISTRY_NAMESPACE --sa-resource-id $(az storage account show --name $TTYF_STORAGE_ACCOUNT_NAME --resource-group $TTYF_RESOURCE_GROUP -o tsv --query id)
- Create a Key Vault:
1
az keyvault create --enable-rbac-authorization false --name $TTYF_KEYVAULT_NAME --resource-group $TTYF_RESOURCE_GROUP
- Assign ‘Key Vault Secrets Officer’ role to Managed Identity for Azure IoT Operations (secrets):
1
az role assignment create --role "Key Vault Secrets Officer" --assignee $(az identity show --name $TTYF_AIO_MI_SECRETS --resource-group $TTYF_RESOURCE_GROUP --query principalId -o tsv) --scope $(az keyvault show --name $TTYF_KEYVAULT_NAME --resource-group $TTYF_RESOURCE_GROUP --query id -o tsv)
Edge Gateway prerequisites
- Create a service principal (service account) to manage Azure from the Edge Gateway running Azure IoT Operations:
1
2
3
4
SPN_Edge=$(az ad sp create-for-rbac --name $TTYF_AIO_SERVICE_PRINCIPAL --role Contributor --scopes /subscriptions/$TTYF_SUBSCRIPTION_ID/resourceGroups/$TTYF_RESOURCE_GROUP)
export TTYF_AIO_SP_APPID=$(echo $SPN_Edge | jq -r .appId)
export TTYF_AIO_SP_SECRET=$(echo $SPN_Edge | jq -r .password)
export TTYF_TENANT=$(echo $SPN_Edge | jq -r .tenant)
- Assign role to the service principal
AIO_SP_APPID1
az role assignment create --assignee $TTYF_AIO_SP_APPID --role "Role Based Access Control Administrator" --scope subscriptions/$TTYF_SUBSCRIPTION_ID/resourceGroups/$TTYF_RESOURCE_GROUP
- Get
objectIdfromMicrosoft Entra IDfor Azure Arc application and create 1 variable:1
export TTYF_ARC_OBJECT_ID=$(az ad sp show --id bc313c14-388c-4e7d-a58e-70017303ee3b --query id --output tsv)
Display the variables you created and keep a note of them for future use
1
printenv | grep TTYF_
Resources after provisioning
You should now see the following resources in Azure (names may vary depending on the variables you defined):
- Resource Group
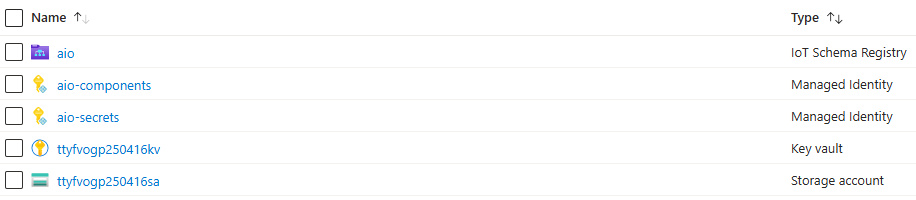
- Entra ID
Prepare and provision Edge Cluster
- Hardware requirements
- Resources:
- CPU:
4 vCPU - Memory:
16GB - Storage:
30GB
- CPU:
- Operating System: the solution requires a Linux-based system, specifically a VM or physical machine running
Linux Ubuntu 24.04. This system will perform as an Edge Cluster, handling queries directly from the production line and interfacing with other operational systems.
- Resources:
Option A (Virtual Machine in Azure Cloud)
- If you want to use a Virtual Machine in Azure, you can deploy it using the Deploy button below:
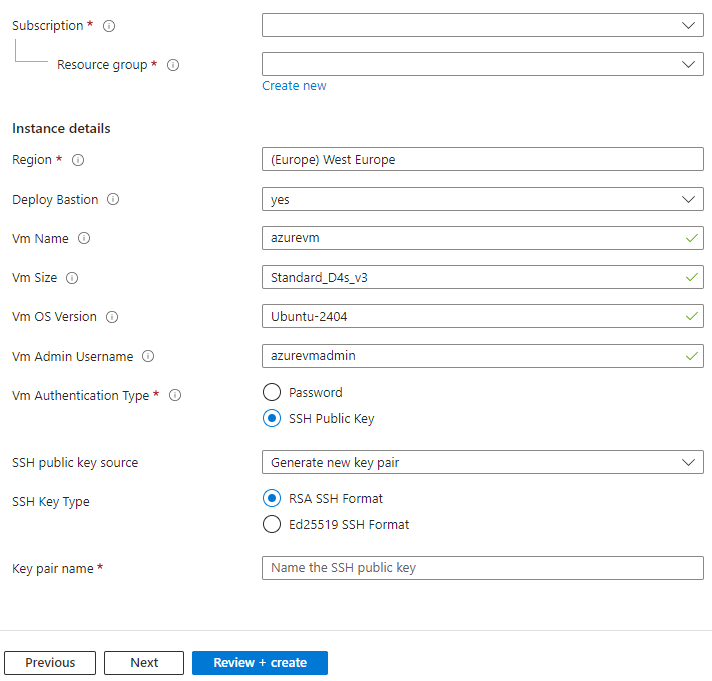 - Fill the required information and click
 Review + create>CreateNote:
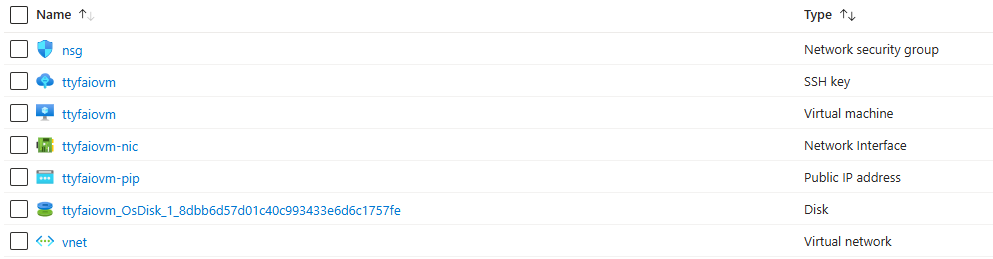
Standard_D4s_v3is the recommended size for the Azure VM. - You should now see the following new resources in your Azure Resource Group (names may vary depending on the variables you defined):
Option B (your own Industrial PC or Virtual Machine)
- Install
Linux Ubuntu 24.04
Azure IoT Operations - Edge installation
- Login and execute the following commands on your Ubuntu Machine
- Retrieve the following environment variables you noted earlier in Cloud Part (result of
printenvcommand), and paste them in the terminal (example below):1 2 3 4 5 6
TTYF_SCHEMA_REGISTRY_NAMESPACE=**** TTYF_FACTORY_AGENT_SERVICE_PRINCIPAL=**** TTYF_ARC_OBJECT_ID=d**** TTYF_SCHEMA_REGISTRY_NAME=**** TTYF_AIO_MI_COMPONENTS=**** ...
- Install
curlandnano:1 2
sudo apt update sudo apt install curl nano -y
- Install K3s
- Run the
K3s installation script:1
curl -sfL https://get.k3s.io | sh - - Create a
K3s configurationfile in.kube/config:1 2 3 4 5 6 7
mkdir ~/.kube sudo KUBECONFIG=~/.kube/config:/etc/rancher/k3s/k3s.yaml kubectl config view --flatten > ~/.kube/merged mv ~/.kube/merged ~/.kube/config chmod 0600 ~/.kube/config export KUBECONFIG=~/.kube/config kubectl config use-context default sudo chmod 644 /etc/rancher/k3s/k3s.yaml
- Increase user watch/instance limits:
1
2
3
echo fs.inotify.max_user_instances=8192 | sudo tee -a /etc/sysctl.conf
echo fs.inotify.max_user_watches=524288 | sudo tee -a /etc/sysctl.conf
sudo sysctl -p
- Increase file descriptor limit:
1
2
echo fs.file-max = 100000 | sudo tee -a /etc/sysctl.conf
sudo sysctl -p
- Run the
- Check K3s installation
1
kubectl get node
- Install Azure prerequisites
- Install
Azure CLI:1
curl -sL https://aka.ms/InstallAzureCLIDeb | sudo bash
- Install
Azure Arc extension:1
az extension add --upgrade --name connectedk8s
- Install
Azure IoT Operations extension:1
az extension add --upgrade --name azure-iot-ops
- Install
- Validate Azure IoT Operations pre-deployment checks
- Before the deployment, use
az iot ops checkto execute IoT Operations pre-deployment checks.1
az iot ops check
- If everything is OK, you can continue with the deployment. If not, please check the Azure IoT Operations documentation for more information.
- Before the deployment, use
- Install Azure IoT Operations
- Connect to Azure using the service principal created in Part 1 - Edge prerequisites
1
az login --service-principal --username $TTYF_AIO_SP_APPID --password $TTYF_AIO_SP_SECRET --tenant $TTYF_TENANT
- Select Azure Subscription:
1
az account set --subscription $TTYF_SUBSCRIPTION_ID
- Connect Kubernetes Cluster to Azure via Azure Arc:
1
az connectedk8s connect --name $TTYF_AIO_CLUSTER_NAME --location $TTYF_LOCATION --resource-group $TTYF_RESOURCE_GROUP --subscription $TTYF_SUBSCRIPTION_ID --enable-oidc-issuer --enable-workload-identity --disable-auto-upgrade
- Get the cluster’s issuer URL:
1 2 3 4 5 6 7 8 9 10 11
OIDC_ISSUER_PROFILE=$(az connectedk8s show \ --resource-group $TTYF_RESOURCE_GROUP \ --name $TTYF_AIO_CLUSTER_NAME \ --query oidcIssuerProfile.issuerUrl \ --output tsv) sudo tee -a /etc/rancher/k3s/config.yaml <<EOF kube-apiserver-arg: - service-account-issuer=$OIDC_ISSUER_PROFILE - service-account-max-token-expiration=24h EOF
- Enable Custom Location support:
1
az connectedk8s enable-features --name $TTYF_AIO_CLUSTER_NAME --resource-group $TTYF_RESOURCE_GROUP --custom-locations-oid $TTYF_ARC_OBJECT_ID --features cluster-connect custom-locations
- Restart K3s:
1
sudo systemctl restart k3s - Check K3s installation
1
kubectl get node
Note: if you encounter an error “WARN[0000] Unable to read /etc/rancher/k3s/k3s.yaml”, execute the following command:
1
sudo chmod 644 /etc/rancher/k3s/k3s.yaml - Initialize Azure IoT Operations foundations installation
1
az iot ops init --subscription $TTYF_SUBSCRIPTION_ID --cluster $TTYF_AIO_CLUSTER_NAME --resource-group $TTYF_RESOURCE_GROUP
- Deploy Azure IoT Operations:
1
az iot ops create --add-insecure-listener --kubernetes-distro K3s --name $TTYF_AIO_CLUSTER_NAME --cluster $TTYF_AIO_CLUSTER_NAME --resource-group $TTYF_RESOURCE_GROUP --sr-resource-id /subscriptions/$TTYF_SUBSCRIPTION_ID/resourceGroups/$TTYF_RESOURCE_GROUP/providers/Microsoft.DeviceRegistry/schemaRegistries/$TTYF_SCHEMA_REGISTRY_NAME --broker-frontend-replicas 1 --broker-frontend-workers 1 --broker-backend-part 1 --broker-backend-workers 1 --broker-backend-rf 2 --broker-mem-profile Low
- Confirm Azure IoT Operations installation
- After the deployment is complete, use
az iot ops checkto evaluate IoT Operations service deployment for health, configuration, and usability. The check command can help you find problems in your deployment and configuration.Note: confirm post deployment checks are green.
1
az iot ops check
- After the deployment is complete, use
- Connect to Azure using the service principal created in Part 1 - Edge prerequisites
Resources after provisioning
You should now see the following new resources in your Azure Resource Group (names may vary depending on the variables you defined):

- Locate your instance in the Azure IoT Operations Dashboard > Instances

Thank you for following this guide!
You have successfully installed Azure IoT Operations on your Azure Arc-enabled Kubernetes cluster!
In the next post, we will explore how to connect Azure IoT Operations to your devices and start collecting data.
Stay tuned for more updates!